Editing You TV Device
To start editing your TV program, click on the TV tab in the subscription section of the Home Screen (right side of the screen), or click on the Programs drop down link in the top left area of the AutoNetTV Drive system, and select TV.
You may have one or more TV devices. If you have more than one, you’ll see each in an orange block with their label (name). Notice the following from this screen:
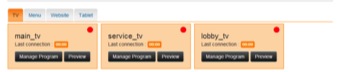
- A red or green circle in the top right corner for each TV device for which you have a subscription. Red indicates the device is not currently connected to the AutoNetTV servers – which is due to some setting or issue with your internet network. Green indicates the device is currently connected to the AutoNetTV servers.
- Last Connection: Tells you the last date/time the device connected to the AutoNetTV servers.
- Preview allows you to immediately see the entire program for that device, full-screen. As shown below, in Preview mode you will see:
- Left and right arrows at the top of the screen. Clicking these arrows will skip forward or backward to the next asset in the playlist.
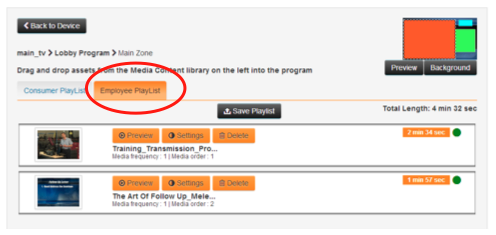
- At the bottom of the screen you’ll see the option to switch between the Consumer and Employee previews.
- Close button in the bottom corner.

- Manage Program takes you to the program playlist for that device.
Managing a Program

Notice the following key areas about the TV playlist screen, shown after clicking Manage Program:
- Screen Layout: This shows you the default layout for the TV program, which consists of the following zones:
- Main Zone: Shown in orange, this is where the videos display. This is the main portion of the program, which mixes entertainment and educational videos.
- Logo Zone: Shown in blue, this is where you can add your logo, or those of your vendors or products.
- Side Zone: Shown in green, this is where you can add images and other items to promote products, specials and services. These generally rotate every 15 seconds.
To edit any of these three zones, simply click on the respective colored area, which will then have a dotted line surrounding it to show that you’re now editing that zone.
- Background: You can click this button to choose a different background image from the AutoNetTV library that fits your needs or branding. You can see what the Background looks like better by clicking on the Preview button, which shows you the entire program full-screen.
- Total Length: This is how long the program loop lasts, before it goes back to the beginning again. Anytime you add or remove assets from the program, the Total Length will automatically adjust.
Note: If you are part of a corporate account, then you may see other items in your playlist that are gray in color, and that you cannot edit. These are assets added into the program from some user at the corporate marketing level.
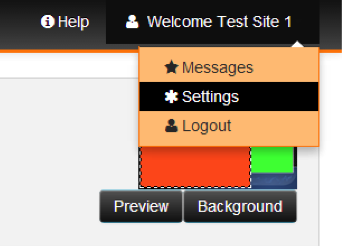
By default, you are looking at the Consumer Playlist, which plays during your business hours. You can edit your Business Hours by clicking in the top right corner of the screen, next to the Help button, and selecting Settings from the drop down list.
Click the tab for Operating Hours. By default, the Consumer program begins playing 30 minutes before your Opening time, and continues playing for 30 minutes after your Closing time. The program will then automatically switch to the Employee program, with content for the professionals at your business.
Any item in the playlist may be moved around to change its order. Simply hold down your left mouse button and drag the item up or down to change the order.
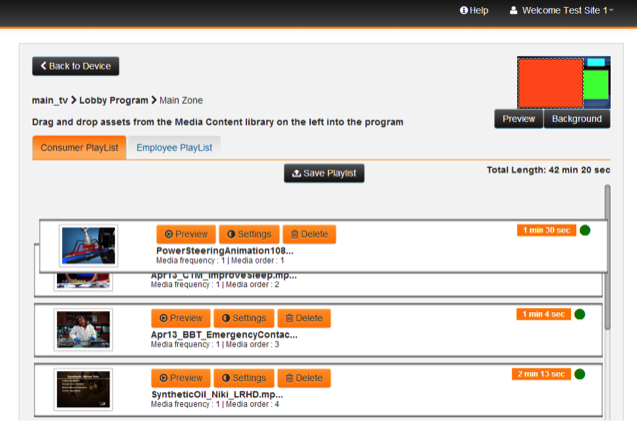
Next to any asset in your playlist, you’ll see the following button options:
- Preview: Allows you to immediately see a preview of the asset, not the entire playlist.
- Settings: Allows you to change the variables about the individual asset.
- Duration (images only): This is how long the asset will appear on screen. The default time for images is 15 seconds. You can change this to any amount of time you wish.
- Order: In addition to being able to drag items up/down within the playlist, you also have the option to specify order number. This is helpful for playlists with many assets that go beyond the viewable screen.
- Start Date: You can specify a date in the future for an asset to begin playing in the program, in its current position or order. This is ideal for promotions, seasonal services, etc.
- End Date: You can also specify an End Date for an asset to stop playing in the program. (NOTE: you do not need an End Date if you have a Start Date.)
If you change the Start and End date of an asset to a future date, you’ll notice the item is still in your playlist, but will have a red circle in its top corner. This indicates the item is not currently playing. You’ll also see the dates underneath the asset name telling you when the asset will play.
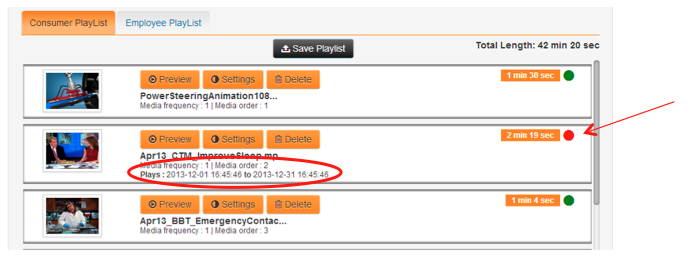
- Delete: Removes an asset from the playlist, but does not remove an asset from the content library.
Any time you add or remove items from the program, the total length will automatically update so you know how long the entire program loop is. Like the driveExperience:Lobby TV program, when the menu playlist reaches the end, it will loop to the beginning without any disruption.
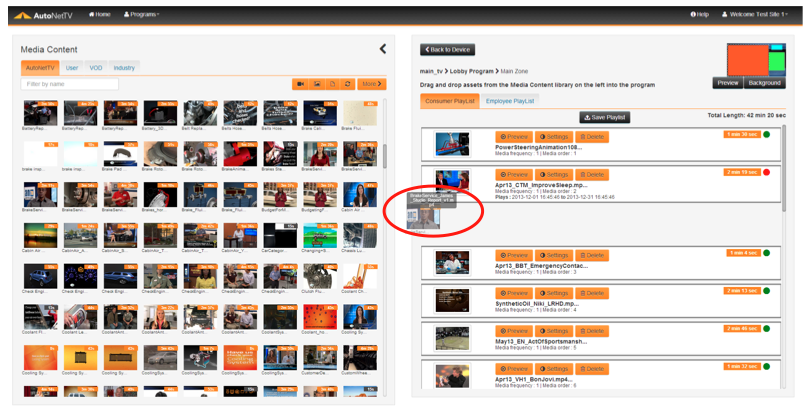
Adding Content
To add any asset to the TV program, from any of the Media Content directories, simply find the asset you wish and then drag and drop it into your playlist on the right. You do this by clicking and holding down the left mouse button once, and then moving your mouse to the right of the screen where you want to place the asset.
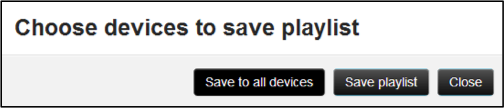
Follow these steps to add, delete or edit any content within the program. When you’re done, click to Save Playlist. You’ll now have the option to save your changes only to this device (if you have more than one TV device subscription), or to save your changes to all of the devices assigned to your account. This gives you an easy way to have the same program on all the TV devices for your account, if you wish.
To edit the Side Zone or Logo Zone, simply click on those images in the Screen Layout image in the top right of the TV playlist screen.
To see and edit the Employee program, click the Employee Playlist with the Main Zone selected.